DigitalOcean is an excellent choice for your website if you want to have maximum control over what’s happening there. You have no limitations, like on regular hostings, and you’ll be able to do anything you’d like. DigitalOcean is also a great choice when you know you’ll have a high-traffic or heavy-resource website.
I use DigitalOcean to host Apollin, and a few of my clients’ big websites (over 500.000 users monthly, with peaks to ~10 thousand at the same time).
One great thing when you use DigitalOcean to host your websites is – you learn a lot of great things (like server administration, DB management), very useful for your future career. And that’s what we’ll be learning today. In general, we’ll build a server for WordPress website (possibly many of them), based on Ubuntu 18.04 droplet with LEMP stack (NGINX, MySQL, PHP) and a few additional features like wp-cli, phpMyAdmin and Redis.
- What DigitalOcean droplet should I choose for WordPress?
- What system should I choose for my WordPress droplet?
- How to install LEMP stack on my droplet?
- How to install and configure WordPress on my droplet?
- Bonus: How to install phpMyAdmin on DigitalOcean droplet?
- Bonus: How to configure NGINX and PHP for the best performance?
- Bonus: How to configure MySQL for the best performance?
- Bonus: How to set incoming and outgoing mails on DigitalOcean for WordPress usage?
- Bonus: How to install Redis for WordPress object cache?
- Bonus: How to monitor my website’s performance in DigitalOcean?
- Bonus: How to set up logging for my WordPress installation?
- Bonus: How to configure my domain in DigitalOcean?
What DigitalOcean droplet should I choose for WordPress?
As per DigitalOcean’s documentation, the droplet is a Linux-based virtual machine running on top of virtualized hardware. You can treat it as a computer, which would be either standalone or a part of a more extensive, cloud-based infrastructure (e.g., with load balancers, database servers, etc.).
Let’s have a brief overview of offered types of droplets:
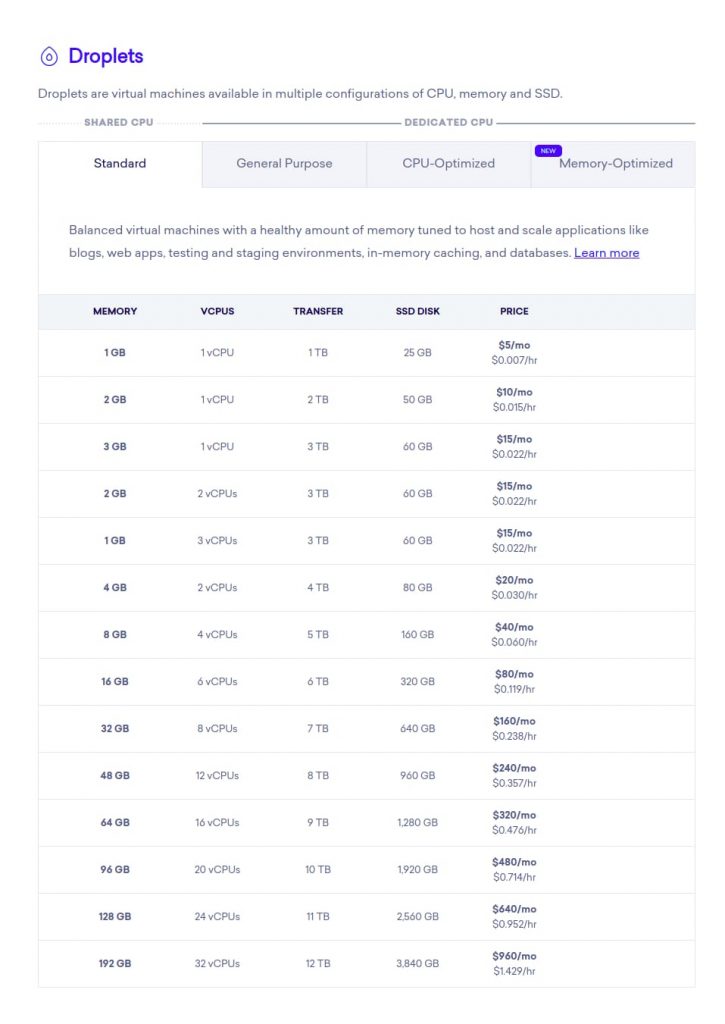
As you can see, DigitalOcean has droplets with shared CPU and dedicated CPU. When you have the first one, you’ll get a share of a real processor (called virtual CPU – vCPU). Most times, it’s perfectly fine to choose Standard droplet type (dedicated CPU ones will be useful when you’ve got resource-intensive and popular application).
The golden rule here, if you don’t know how many resources you’ll need, is to choose the cheapest droplet and monitor it later in your dashboard (DigitalOcean provides monitoring for your memory, disk, and CPU usage). If you see your usage often in the 75-100% range, it’s time to switch your droplet to a bigger one. But it’s not an issue and takes only 5 minutes!
Do I need more RAM, vCPU or disk storage?
Just like I mentioned in previous paragraphs, I’d start with some cheap option and then carefully monitor my resources usage; you can also set up alerts for specific metrics (e.g., email me when my RAM usage is over 75%).
When you do, an notice a lot of spikes close to 100% usage – it is the perfect opportunity to expand your droplet and add more memory/vCPUs to it. Otherwise, there is no simple answer to whether you should invest in more memory or computation power.
There is no simple answer on whether you should invest in more memory or computation power.
However, if I’d have to predict – you’ll probably need more RAM as your website will grow larger. More memory will allow your website to run smoothly, primarily because MySQL will be able to use it to store temporary tables and indices there. Furthermore, PHP will use it for its purposes if you’ve got some more complicated functionalities (e.g., generating PDFs – invoices or so). CPU-intensive applications are usually related to CI/CD, video and image processing, or machine learning, and your WordPress probably won’t do that.
One more thing you can decide for immediately is whether you’d like to have more disk storage, as starter droplets have quite a small amount of it (5$ droplet is only 25GB SSD storage). Adding more disk storage to DigitalOcean is very easy and cheap – just $1 per 10GB of additional storage. You can consider it if you’re planning to have, e.g., a photography website, which requires a lot of high-quality photos.
Should I have a separate droplet for MySQL?
DigitalOcean, as a cloud provider, allows you to create your cloud-based infrastructure. It’s a great way to learn the basics of DevOps and how large-scale systems work. You could, for example, set up the load balancer dividing the traffic between a few droplets or have a separate cache machine or proxy like Vagrant.
The case is, you most probably won’t need it until you’re The Washington Post. One thing you could consider is whether you should have a separate database droplet. Until you’ve got quite a small WordPress application, it’s perfectly fine to run everything on one server.
However, if you grow up rapidly and process a lot of data within the database, it’s good to have it on a separate host. Big databases need a lot of memory assigned to them, and it’s almost effortless to connect to an external database with WordPress.
Furthermore, DigitalOcean has got a particular type of product designed, especially for a need like this – Managed Databases. Managed Database is like a database-server droplet, tailored especially to run DBMSs like MySQL, Redis, or PostgreSQL. The great thing here is it’s highly-scalable, you’ve got free, daily backups, automated failover management (so if your database failures, it’s automatically recreated and switched).
What system should I choose for my WordPress droplet?
DigitalOcean offers us a few operating systems, all of them coming from Unix-family:

In short, we’ve got four Linux systems and one BSD system:
- FreeBSD – Unix-like operating system descended from BSD. The main difference from Linux is FreeBSD maintains a complete system (so all drivers, utilities, as well as the kernel).
- Debian – Linux-based system, as well as three next ones. Debian is very stable, as it is quite close to the original Linux. The cost is, usually, most packages are older versions.
- Ubuntu – operating system based on Debian, the most popular Linux distribution.
- Fedora – operating system based on Red Hat Enterprise Linux (RHEL), competitive branch to Debian one.
- CentOS – also based on RHEL.
What system will be the best for WordPress based application?
Generally speaking, it’s the matter of your preferences – which system you should use for your web applications. In this article, I’ve chosen Ubuntu because of the following reasons:
- I have it installed on my personal computer (dual-boot), so I know how to use it.
- It’s simple to start using it.
- It’s the most popular Linux distribution, meaning you’ll find LOTS of articles and tutorials if you get into any troubles.
Given the above points, if you’re quite fresh to Linux world, I’d recommend you to choose Ubuntu as well. Another thing is, as a side note, it’s great to have a dual-boot system (Windows alongside Ubuntu), as you can also use a graphical interface. In the future, I’ll write an article about my environment.
Initial installation, creating system users
Disclaimer: links to DigitalOcean used in this post are my referral links. They allow you to get $100, 30-day credits, excellent to try DigitalOcean’s services, and learn a lot of useful technologies and skills. I get $25 in DigitalOcean’s credits after you’ve spent $25. You don’t have to use my referral links; at the end of this post, I’ll gather these links without a referral.
Let’s create our droplet. First, you’ll need to create an account; you can do it under this link (with $50 credit bonus). After registering and logging into your dashboard, click the green ‘Create’ button in the upper-right corner.

- Choose Ubuntu 18.04 as your operation system. We’re picking 18.04 as it’s LTS – Long-Time Support version. For production environments, you should always select the LTS version of your software to not worry about updating them to the next major releases after a short time. Ubuntu 18.04 will receive support until April 2023.
- Choose a plan, start with “Standard”, and $5/mo droplet.
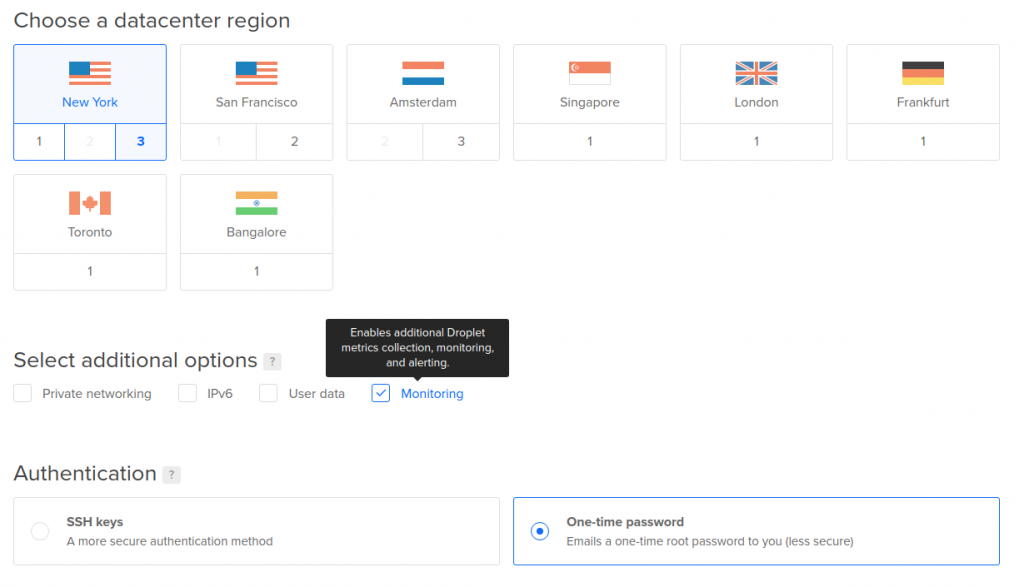
- Choose the datacenter. Here you should choose the one being the closest to most of your visitors. So, if you’ll have a website with news from Canada, you’d most probably choose Toronto.
- Check ‘Monitoring’ to enable droplet’s metrics collection.
- If you’re comfortable with using SSH keys, choose this option in the ‘Authentication’ section. If you’re not, select ‘One-time password.’
- Create your droplet.
After your droplet gets created, you’ll receive an email with your droplet’s IP and root password. SSH into it using credentials from this email.
ssh root@droplet_ip
Now, we want to add a new user (you absolutely shouldn’t use root daily), grant him sudo permissions, and enable the firewall.
adduser your_user_name
usermod -aG sudo your_user_name
ufw allow OpenSSH
ufw enable
How to install LEMP stack on my droplet?
When we’re using WordPress, we’re somewhat limited if it comes to language and database management system choice. We’re just using PHP, and we always want to use the newest version due to security and performance reasons, and MySQL. The only choice we can make if it comes to PHP and MySQL is the version.
However, we can choose the webserver. These are the most popular ones:
- Apache
- NGINX
- Lighttpd
If the performance and ease of use are what you’re aiming for, NGINX will be the best option for the WordPress-based website. If you want to make a conscious decision, take a look at this comparison.
Installing web server – NGINX
Run following commands in the command line:
sudo apt-get update #update package information
sudo apt-get install nginx #install nginx
sudo ufw allow 'Nginx Full' #allow nginx through the firewall
sudo ufw status #check if nginx is in the output of this command
Installing database management system – MySQL
Run following commands in the command line:
sudo apt-get install mysql-server #install mysql
sudo mysql_secure_installation #secure mysql installation
The second command is worth comment.
mysql_secure_installation allows you to secure your installation (you should always do it by default with a maximum level of security). It’ll ask you a couple of questions, which you should answer Y, like Yes. After them, the script will remove anonymous users and disable the remote root login.
The first question will ask you whether to enable password plugin (Y) and what level of strictness should it use. Choose level 2 (strong), so you’re sure your passwords are almost impossible to break.
The next thing you should do to strengthen the security of your MySQL installation is to disable the auth_socket plugin for logging in, as it allows you to log in to MySQL’s root account without providing credentials.
sudo mysql
Now you should set your root user password:
ALTER USER 'root'@'localhost' IDENTIFIED WITH mysql_native_password BY 'new_secure_password';
FLUSH PRIVILEGES;
EXIT;
Installing PHP and necessary extensions
Run following commands in the command line:
sudo apt install php-fpm php-mysql php-curl php-gd php-intl php-mbstring php-soap php-xml php-xmlrpc php-zip #install php and necessary extensions
sudo systemctl restart php7.2-fpm #restart php
Configuring NGINX to use PHP and point to our website, creating a new database
If you’ve got the domain you’d like to use with your WordPress installation, follow steps in Bonus: How to configure my domain in DigitalOcean on the bottom of this article to point your domain to your droplet and come back here. Otherwise, use your droplet’s IP in place of the domain name.
Create a new server block for your website
The server block is an NGINX configuration of your website. Let’s create it:
sudo vim /etc/nginx/sites-available/your_domain.com
Copy and paste (Ctrl+Shift+V to paste into vim) the following configuration. Remember to replace your_domain.com with your actual domain (or IP)
server {
        listen 80;
        root /var/www/your_domain.com;
        index index.php index.html index.htm index.nginx-debian.html;
        server_name your_domain.com www.your_domain.com;

        location / {
                try_files $uri $uri/ /index.php$is_args$args;
        }

        location ~ \.php$ {
                include snippets/fastcgi-php.conf;
                fastcgi_pass unix:/var/run/php/php7.2-fpm.sock;
        }

        location ~ /\.ht {
                deny all;
        }

        location = /favicon.ico { log_not_found off; access_log off; }
        location = /robots.txt { log_not_found off; access_log off; allow all; }
        location ~* \.(css|gif|ico|jpeg|jpg|js|png)$ {
                expires max;
                log_not_found off;
    }
}
Next, we should make a symbolic link to /etc/nginx/sites-enabled and voila, we’re ready!
sudo ln -s /etc/nginx/sites-available/your_domain.com /etc/nginx/sites-enabled/ #create symlink
sudo nginx -t #check if no errors
sudo systemctl reload nginx #reload nginx configuration
Set up SSL for your domain
SSL is very important these times, and what’s important, it’s very easy (and free!) to set up for your domain. We’ll do it using Let’s Encrypt, a free, automated and open Certificate Authority.
sudo add-apt-repository ppa:certbot/certbot #add certbot packages
sudo apt install python-certbot-nginx #install certbot for nginx
sudo certbot --nginx -d your_domain.com -d www.your_domain.com #install certificate for your domain, choose option 2 [redirect all requests]
Create a new database for your website
Enter MySQL CLI:
mysql -u root -p
Now let’s create a new database and a dedicated user.
CREATE DATABASE your_database_name DEFAULT CHARACTER SET utf8 COLLATE utf8_unicode_ci;
GRANT ALL ON your_database_name.* TO 'your_new_user'@'localhost' IDENTIFIED BY 'your_new_user_password';
FLUSH PRIVILEGES;
EXIT;
How to install and configure WordPress on my droplet?
Now we have almost everything ready – you created the database and should be able to reach your website at http://your_domain.com, the only thing we’re missing is fresh WordPress installation. The fastest and easiest way to install it is to use WP-CLI.
Installing WP-CLI
WP-CLI is the command-line interface for WordPress. You can update plugins, configure multisite installations and much more, without using a web browser. Unbelievably useful tool. Let’s install it:
curl -O https://raw.githubusercontent.com/wp-cli/builds/gh-pages/phar/wp-cli.phar #download wp-cli
php wp-cli.phar --info #check if it's working
chmod +x wp-cli.phar #assign execute permissions
sudo mv wp-cli.phar /usr/local/bin/wp #make it a global command
wp --info #verify it's working
Installing WordPress
Now the installation of WordPress is as easy as running the WP-CLI command:
cd /var/www
mkdir your_domain.com #create directory for your website
sudo chown -R youruser:www-data your_domain.com/
wp core download
wp config create --dbname=your_database --dbuser=your_database_user --dbpass=your_database_user_password
wp core install --url=your_domain.com --title=Example --admin_user=your_admin_user --admin_password=your_admin_password --admin_email=info@your_domain.com
And that’s how we installed our WordPress, we’re ready and set to go! However, it’s not the end of this article as I’ve prepared a couple of bonus sections for you to maximize the performance of your droplet, create alerts for different metrics and install utility tools (like phpMyAdmin). Check them out!
- How to install phpMyAdmin on DigitalOcean droplet?
- How to configure NGINX and PHP for the best performance?
- How to configure MySQL for the best performance?
- How to set incoming and outgoing mails on DigitalOcean for WordPress usage?
- How to install Redis for WordPress object cache?
- How to monitor my website’s performance in DigitalOcean?
- How to set up logging for my WordPress installation?
- How to configure my domain in DigitalOcean?
Bonus: How to install phpMyAdmin on DigitalOcean droplet?
PhpMyAdmin allows you to browse your databases within web UI easily, it’s free software written in PHP with MySQL administration in mind. A lot of developers use it to access their database online, without console usage.
However, if you plan to use it on a production server, you have to secure it properly:
- restrict access to it based on e.g., Basic Authorization,
- create a dedicated user with read-only permissions,
- use some non-standard path/domain.
Let’s do it:
sudo apt-get install phpmyadmin
#it'll show prompt with web server choice, press Tab and then OK, as there's no NGINX on this list
mkdir -p /var/www/db.your_website.com/pma # create web directory for PMA
sudo ln -s /usr/share/phpmyadmin /var/www/db.your_website.com/pma
#create symbolic link to the newly created directory
sudo vim /etc/nginx/sites-available/db.your_website.com #create and set NGINX configuration, contents below
sudo ln -s /etc/nginx/sites-available/db.your_website.com /etc/nginx/sites-enabled
sudo nginx -t #check if everything looks ok
sudo systemctl nginx restart
I’m assuming you’ll create and point a subdomain for phpMyAdmin usage, e.g., db.your_website.com
Contents of /etc/nginx/sites-available/db.your_website.com:
server {
    server_name db.your_website.com;
    root /var/www/db.your_website.com/pma;

    index index.html index.htm index.php;

    charset utf-8;

    location / {
        try_files $uri $uri/ /index.php?$query_string;
    }

    location /pma {
        auth_basic "Admin Login";
        auth_basic_user_file /etc/nginx/phpmyadmin_pass;
    }

    location = /favicon.ico { access_log off; log_not_found off; }
    location = /robots.txt  { access_log off; log_not_found off; }

    error_page 404 /index.php;

    location ~ \.php$ {
        fastcgi_pass unix:/var/run/php/php7.2-fpm.sock;
        fastcgi_index index.php;
        fastcgi_param SCRIPT_FILENAME $realpath_root$fastcgi_script_name;
        include fastcgi_params;
    }

    location ~ /\.(?!well-known).* {
        deny all;
    }
}
If you analyze the configuration above, you’ll probably notice this part:
location /pma {
       auth_basic "Admin Login";
       auth_basic_user_file /etc/nginx/phpmyadmin_pass;
}
We’re setting Basic Authorization here, when entering our phpMyAdmin dedicated domain, we’ll see something like this:
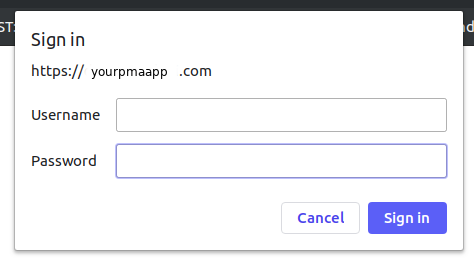
It takes credentials from the file located under /etc/nginx/phpmyadmin_pass. Let’s create these credentials and edit the mentioned file:
openssl passwd Your_Unique_8Letter_Password #output will be something like FstYhSVcJjmWU. Copy this value
sudo vim /etc/nginx/phpmyadmin_pass

.../etc/nginx/phpmyadmin_pass contents:...
someuser:FstYhSVcJjmWU
Now we’ll add SSL certificated to our phpMyAdmin (just like we did with our normal application):
sudo certbot --nginx -d db.your_website.com
And the last step, log in as a MySQL’s root user (or any other with Create Users privilege)
GRANT SELECT ON database_name.* to 'new_username'@'localhost' IDENTIFIED BY 'password';
FLUSH PRIVILEGES;
EXIT;
And we’re ready! Access your phpMyAdmin instance at https://db.your_website.com/pma, authenticate with credentials you’ve created in /etc/nginx/phpmyadmin_pass and browse your database as a user you’ve added in the last step.
Bonus: How to configure NGINX and PHP for the best performance?
Let’s tune our NGINX and PHP configuration a little bit for our app usage. Consider these as very basic optimizations and remember – there’s no simple way to max out your server’s performance. There are a lot of factors affecting it, and usually, you’d need some dedicated, custom set up.
Consider worker_processes and worker_connections settings
In nginx.conf file, you have a lot of different variables determining your web server’s behavior. Two of the most important ones are worker_processes and worker_connections.
worker_processes – the number of NGINX worker processes, one is the default value. The golden rule here is to set worker_processes = number of CPU cores. So if you have DigitalOcean’s droplet with 4vCPU, set worker_processes=4
worker_connections – the maximum number of concurrent connections each worker can handle, 1024 is the default value. So, the overall worker_connections number is worker_processes * worker_connections. I usually leave it with the default value (although you can experiment and try e.g., 2048 worker connections, then look at your website’s performance).
Enable browser cache for your website
If you want to score higher in speed testing tools, and, by the way, save some resources and bandwidth, you should enable cache directives for your website. In your website’s configuration, paste the following lines:
location ~* \.(jpg|jpeg|gif|png|css|js|ico|xml)$ {
    access_log        off;
    log_not_found     off;
    expires           360d;
}
They’ll cache all resources with provided extensions (images, styles, scripts, XML documents) for 360 days.
Enable GZip compression
Setting up GZip compression is very easy in NGINX, and should give you a significant performance boost. Quick win!
To enable GZip compression, you should set these values in /etc/nginx/nginx.conf file:
gzip on;
gzip_vary on;
gzip_min_length 10240;
gzip_proxied expired no-cache no-store private auth;
gzip_types text/plain text/css text/xml text/javascript application/x-javascript application/xml;
gzip_disable "MSIE [1-6]\.";
Remember to restart NGINX after all of your changes!
sudo systemctl nginx restart
Bonus: How to configure MySQL for the best performance?
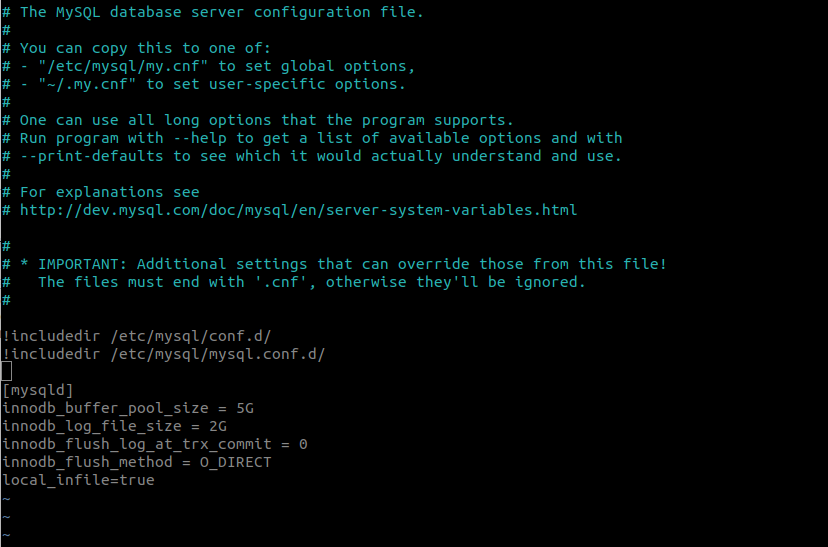
We’ll take care of several basic MySQL configuration variables to instantly boost the database’s performance after our installation. Usually, MySQL custom configuration is stored in /etc/mysql/my.cnf.
Here’s what we’ll adjust:
innodb_buffer_pool_size– the buffer pool is where our data, temporary tables during queries, and, what’s very important, indices are cached. The default value is 256MB, but the golden rule here is to adjust this value to 50-60% of your sever’s available memory if it’s an all-in-one server (so you’ve got here web server, your website, and database). If you use separate MySQL server, set this value even to 80% of available RAM. If you followed this article and made a choice of 1GB RAM droplet, set it to 512MB.innodb_log_file_size– the size of the redo logs, useful for efficient and durable writes. You won’t rather need it unless your app is quite write-heavy (e.g., you make a lot of big-file imports to the database). If it is, and you’ve got good enough server, experiment with it a little bit and check results to find out the ideal value here.innodb_flush_log_at_trx_commit– the default value is 1, which helps to keep InnoDB ACID compliant. This value means you’ll never lose any data during some crash in a transaction. If you set it to 0 or 2, you may lose up to 1 seconds worth of transaction during the crash. 0 – any mysqld crash will erase the last second, 2 – any operating system crash will erase the last second. If it’s acceptable to lose some data, you can set it to 0 or 2 for better performance.innodb_flush_method– defines the method used to flush the data to data files and log files. The default value isO_DSYNC; we can set it toO_DIRECTto avoid double buffering.
One thing to add here: these configurations should be under [mysqld] line, if you don’t have it in your my.cnf file, add it.
[mysqld]
innodb_buffer_pool_size = 512M
innodb_log_file_size = 256M
innodb_flush_log_at_trx_commit = 0
innodb_flush_method = O_DIRECT
Bonus: How to set incoming and outgoing mails on DigitalOcean for WordPress usage?
Email is the last one out of these basics that we were still missing. Let’s take care of it. We’ll use external services to manage incoming and outgoing emails. Why? Believe me: you don’t want to administer your email server until you’re an extraordinarily big player.
If we’d go “own email server” way, you’d have to apply security patches frequently, update spam lists, take care of email management, and a lot of other things. It’s just easier and cheaper to rely on other services.
You probably noticed I’ve separated email services into two ones: incoming and outgoing. It’s because these are entirely different protocols, specializations and there are dedicated solutions for both of them.
Outgoing emails
The most popular options here include SendGrid, Mailgun, Sendinblue. I use SendGrid and find it the easiest to set up; thus, we’ll use it for this article. Also, what’s important, it’s free up to 100 emails per day.
First, sign up here.
After registering and logging in, enter the Sender Authentication panel. Here you can provide Domain Authentication and Link Branding. SendGrid will ask you to put displayed strings into your domain’s TXT records, which you can do in DigitalOcean’s Networking panel.
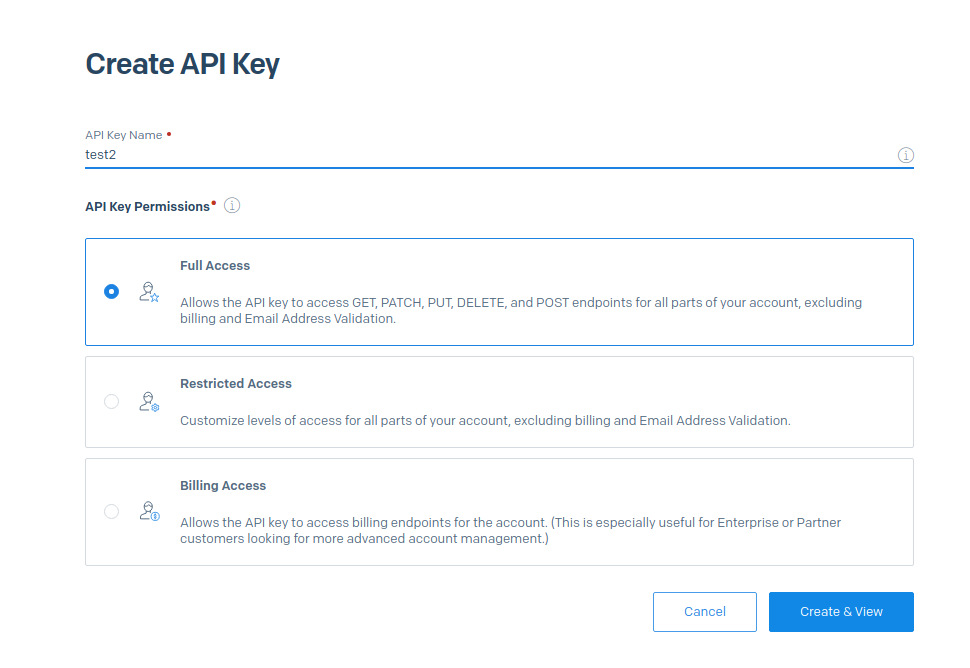
Now it’s time to make use of the SendGrid. Head to API Keys tab and hit the ‘Create API Key’ button. Enter the name, select ‘Full Access’ and create the key. Copy it.
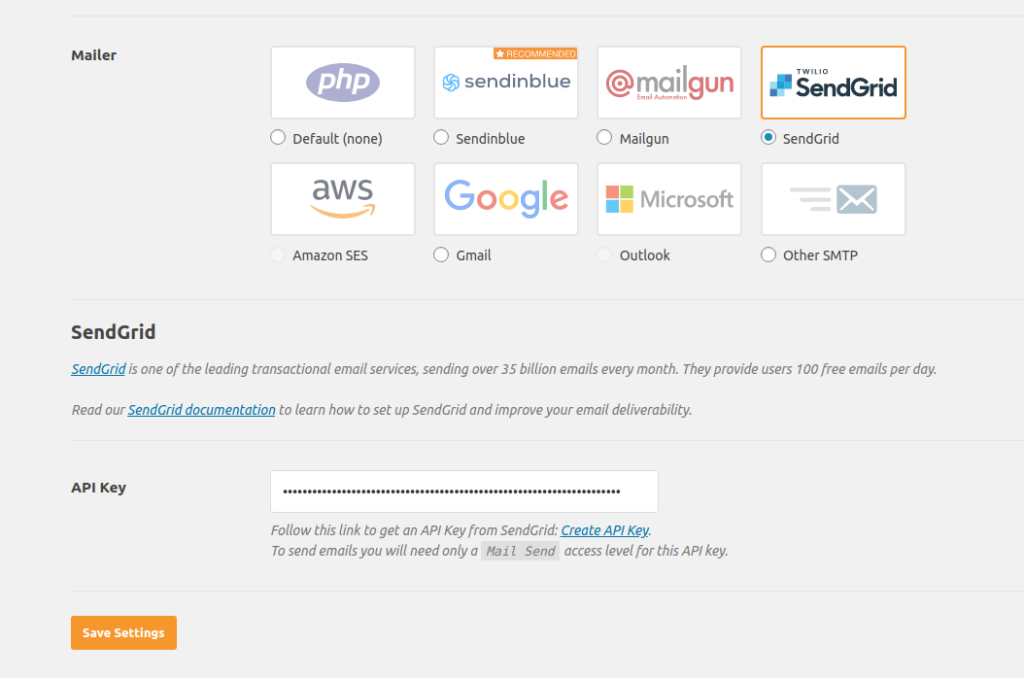
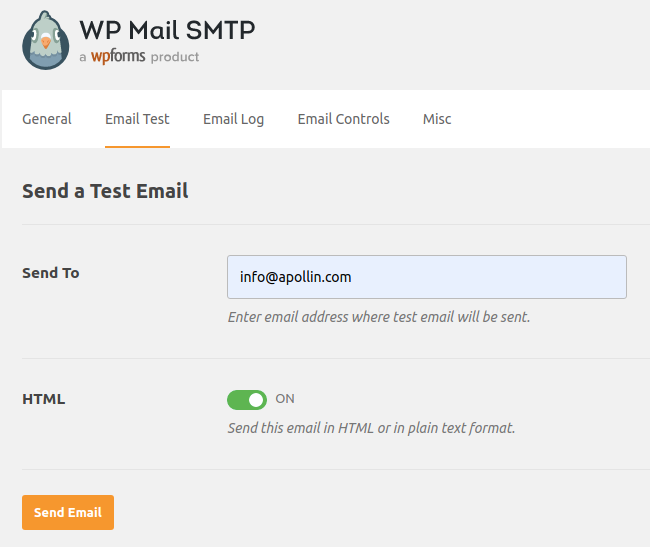
To handle emails in WordPress, we’ll use the WP Mail SMTP plugin. Install it on your website and go to the Settings tab. Choose SendGrid as your email provider and enter your API key.
Now we’re ready to test if sending mails works as intended. Head to the ‘Email Test’ tab in the WP Mail SMTP page. Type email you’d like to send the message to and click the button. Hooray, it’s working!
Incoming emails
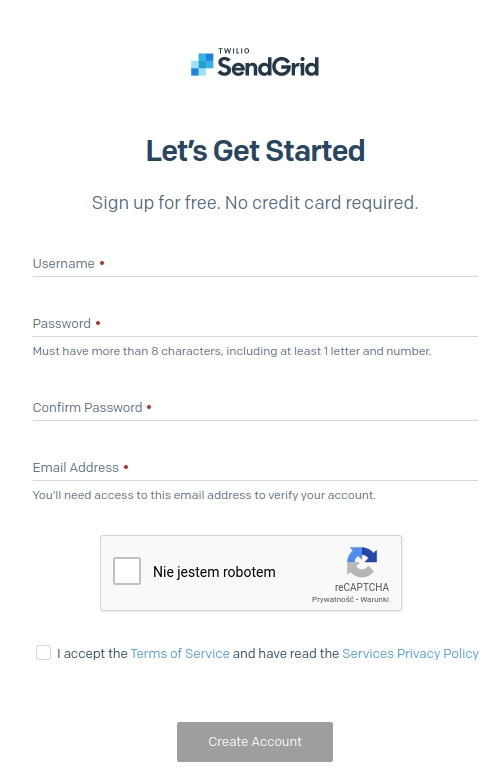
I’m using Zoho for my email hosting; I’ve chosen it because it’s free. However, after a year of using it, I have to say Zoho has got a comprehensive interface, so I can highly recommend it. Let’s go through the setup. First, enter this page and click “Sign up for free”.

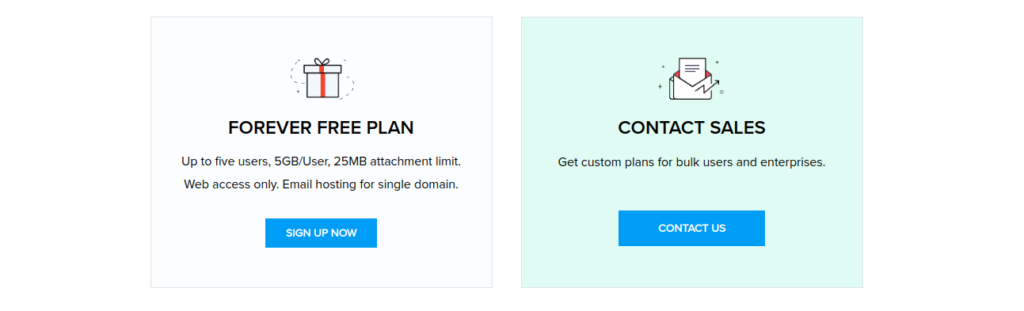
Afterward, scroll down and choose the ‘Forever free plan’.
You’ll have to enter your domain address and fill in your details. After successful registration, Zoho will prompt you to modify your DNS records. Head to your DigitalOcean panel, enter the ‘Networking’ tab, and select your domain.
You’ll have to add the following MX records:
- Value:
mx.zoho.eu, Host: @, Priority: 10 - Value:
mx2.zoho.eu, Host: @, Priority: 20 - Value:
mx3.zoho.eu, Host: @, Priority: 50
Following TXT record:
v=spf1 include:zoho.eu ~all
And verification TXT record displayed by Zoho. After you’ve clicked verify and Zoho confirmed you own your domain, you’re ready to receive emails! Check it out.
Bonus: How to install Redis for WordPress object cache?
sudo apt-get install redis-server
sudo systemctl status redis #test redis status (should be active)
sudo apt install php7.2-dev
pecl install redis
The last command will output something like /usr/lib/php/20190902/redis.so. Copy this value and paste it into extensions section of php.ini – /etc/php/7.2/fpm/php.ini as
extension=/usr/lib/php/20190902/redis.so
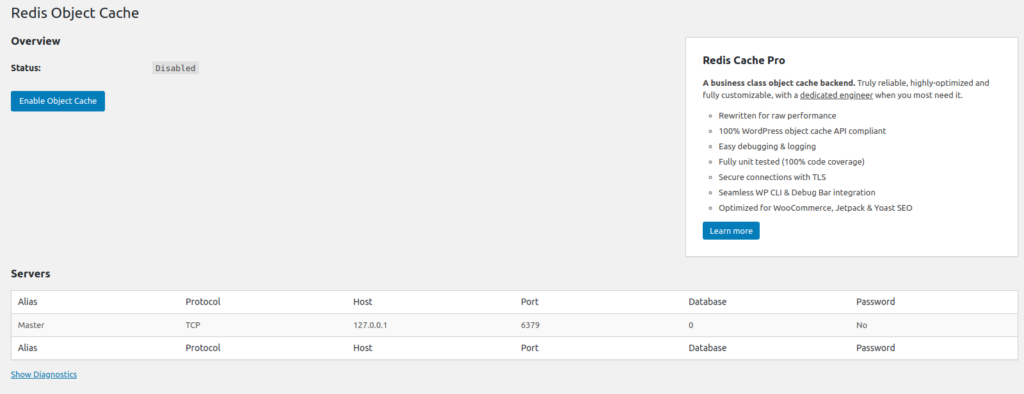
After it, we’ve got Redis and phpredis installed on our server. Be sure to restart PHP using sudo systemctl restart php7.2-fpm. Let’s install the Redis Object Cache plugin in our WordPress. After installation, head to Settings > Redis, and click the Enable button.
Caution: if you’ve got several WordPress websites, each one should use different Redis database for its cache. To achieve it, place this line in your wp-config.php for each site: define(‘WP_REDIS_DATABASE’, 1);, where you should replace 1 with a unique number (unique per website). By default, Redis is running 15 databases.
Bonus: How to monitor my website’s performance in DigitalOcean?
Monitoring in DigitalOcean is free!
If you’ve checked the ‘Monitoring’ checkbox during droplet’s creation, you’re all set in! And if not, no worries. SSH into your droplet and type below command to install it:
curl -sSL https://repos.insights.digitalocean.com/install.sh | sudo bash
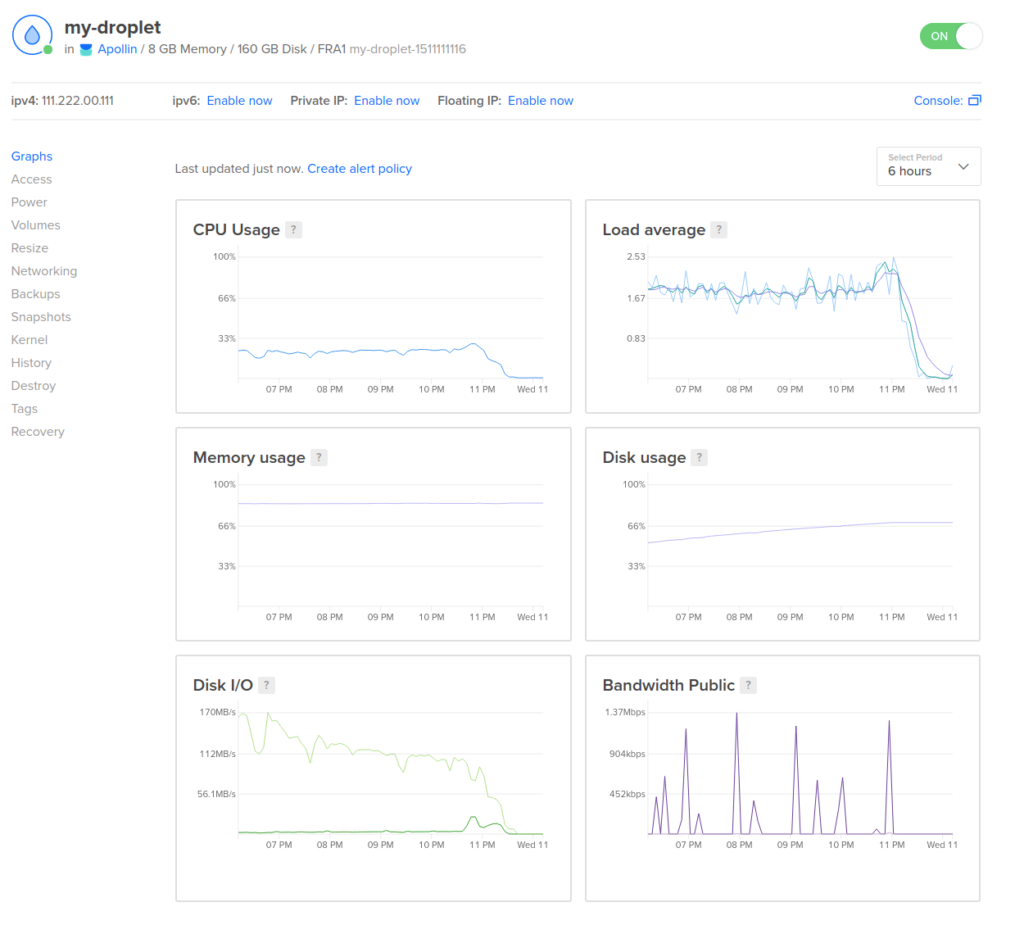
In your droplet’s control panel, in the Graphs section, you should see something like the below image.
If you hover over graphs, you’ll see a popup with detailed statistics:
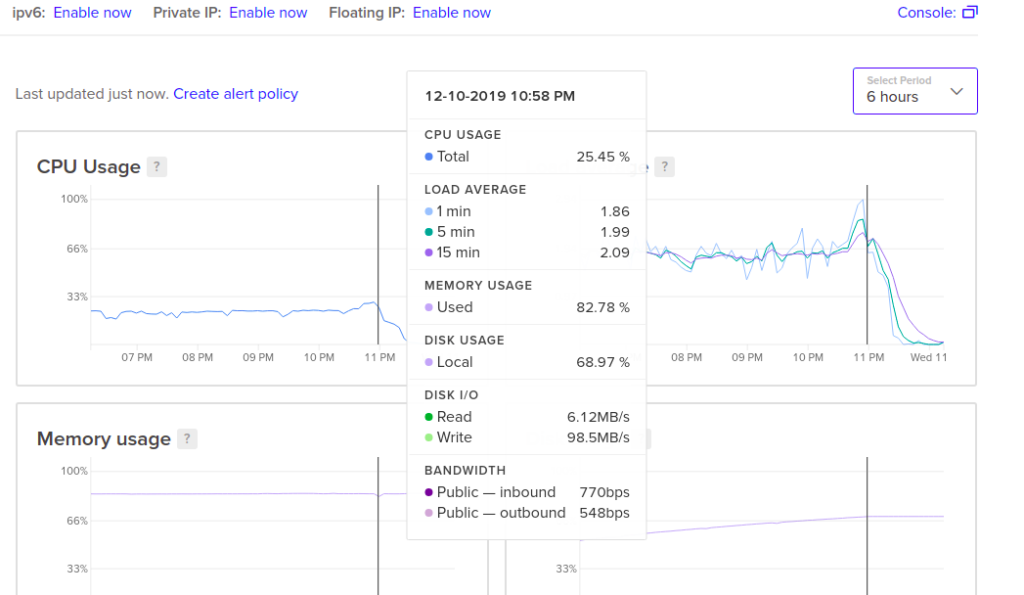
All of these graphs are quite self-descriptive, anyway, let’s go through all of them:
- CPU Usage – total processing power usage percentage.
- Memory usage – total RAM usage percentage.
- Disk I/O – the percentage of disk’s In/Out operations performed on your droplet.
- Load average – checks if CPU is keeping up with queued processes.
- Disk usage – what percentage of your disk is used.
- Bandwidth public – bandwidth usage in megabits per second.
All of these graphs combined allow you to analyze your droplet’s health and performance. If you notice you’re frequently out of memory – it’s time to either make your server applications more performant or extend your droplet.
If you see CPU Usage being high, time to check it and possibly add more vCPUs to your droplet.
If your storage is almost running out of space, time to add Block Storage to your droplet.
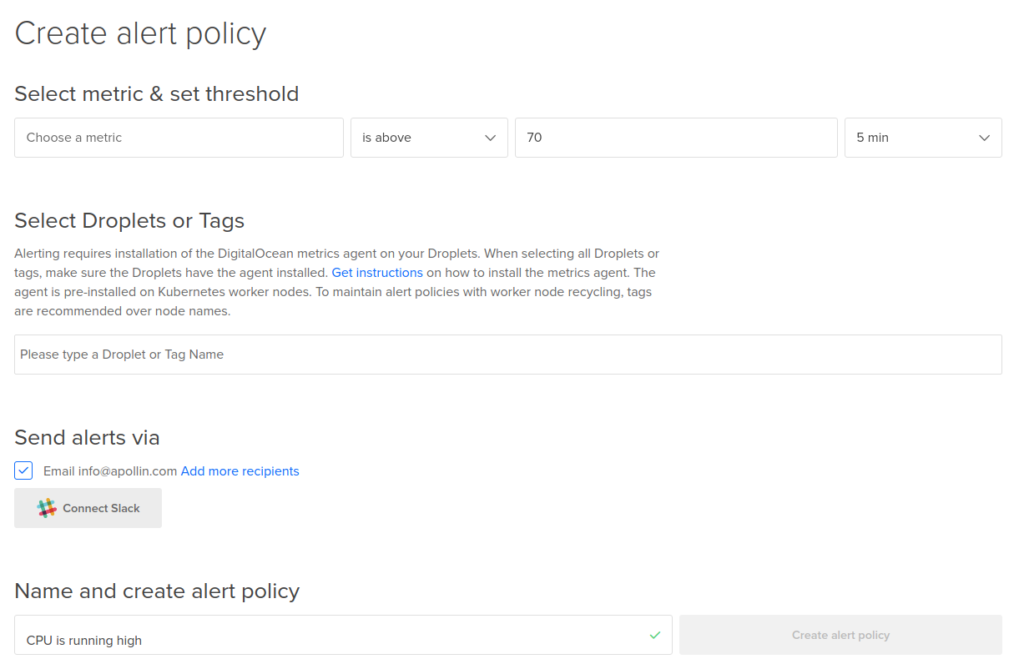
What’s the most important here, you can create alerts for your metrics to get notified when something terrible is happening and react accordingly before it’s too late. Just click the ‘Create alert policy’ link and set yours!
Bonus: How to set up logging for my WordPress?
In the production environment, you want to make sure your WordPress doesn’t throw stack traces at your users’ faces when they encounter some error on your website. However, you still want to have an overview of what’s going on, especially if it’s something that shouldn’t be happening.
That’s why you have to configure WordPress to handle it with ease properly. Luckily, it’s straightforward.
Configuration of logging takes place in wp-config.php file, you just have to set log variables to:
define( 'WP_DEBUG', true );
define( 'WP_DEBUG_LOG', true );
define( 'WP_DEBUG_DISPLAY', false );
WP_DEBUG– enable loggingWP_DEBUG_LOG– enable logging to fileWP_DEBUG_DISPLAY– disable frontend log printing
Logs will be available in your WordPress’ wp-content/ directory.
Bonus: How to configure my domain in DigitalOcean?
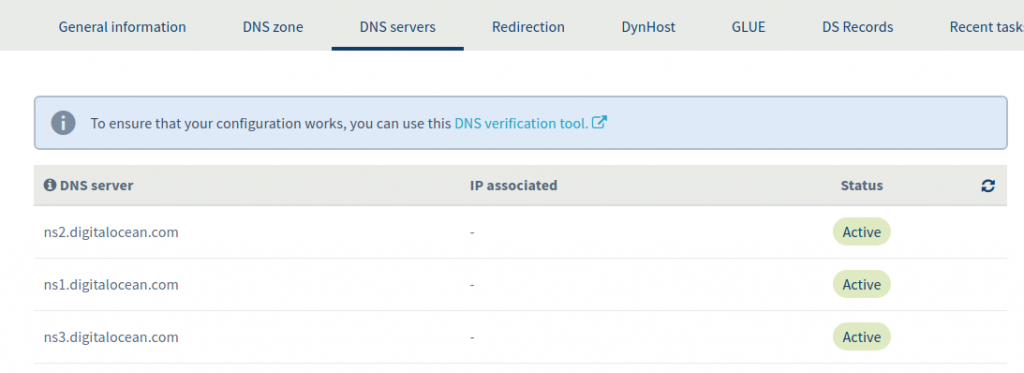
Wherever you’ve bought your domain, if you want to use it with your DigitalOcean’s droplet, you have to change the domain’s nameservers (NS records). Usually, it’s hidden in option similar to ‘Domain Configuration’ on the platform where you bought your domain. You should set your NS servers to:
ns1.digitalocean.comns2.digitalocean.comns3.digitalocean.com
In OVH it should look like this:
DNS propagation should take between 12-24 hours. If you want to start configuring the domain on your server already, edit your hosts file:
$ sudo vim /etc/hosts
...
your_server_ip your_domain
# example:
# 101.101.101.1 apollin.com
Afterward, you should enter your DigitalOcean control panel, head to the ‘Networking’ section, and add your domain there.
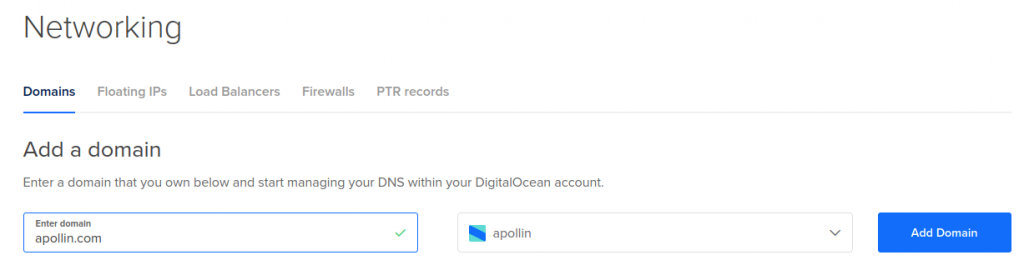
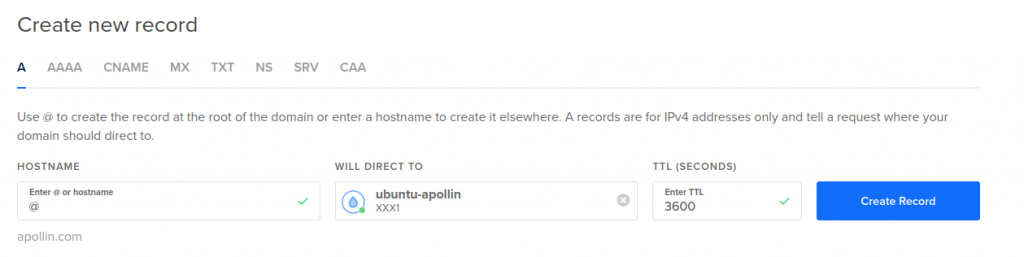
Now it’s the time to point our domain to the server. Click create new records, in the hostname enter @, ‘Will redirect to’ – should be your droplet. As simple as that! If you’d also like to process www. version of your website, repeat the process with www instead of @. That’s it!
Link to DigitalOcean without referral code: https://www.digitalocean.com/
10 Responses
Very good overview, but why no mention of the very popular FastCGI Cache, which is arguably much more effective than object caching, etc? And you can even disable browser caching altogether and let Nginx decide when HTML content is outdated or not.
Would appreciate your feedback on our project:
http://mirrors.slickstack.io/nginx/
And thanks for being one of the few LEMP tutorials that mentions InnoDB tuning!
Thanks for your comment Jesse! Of course, my bad, I completely forgot about FastCGI, will make sure to update the post and mention you there, thanks a lot for pointing this out!
I’ll definitely check your project (and probably mention it/post about it), it seems very interesting. Once again, thanks and all the best, Jesse!
Hey Arek, thank you for this article. I’m a newbie to the whole thing and managed to get through most of it with the help of G too. However, I’m stuck now – get a 403 when loading my domain.
I noticed there’s a /var/www/html folder and it seems to be the recommended location for website files to load based on DO’s article
Is it possible that the WP files needed to be in there for the website to load?
Thanks in advance.
Hi Danny!
Yeah, the /var/www/html is the default location for websites on Ubuntu, but they can be anywhere, basically. I usually recommend named directory, like in above article in this section: https://apollin.com/digitalocean-wordpress-setup#installing-wordpress
So, e.g. apollin.com is in /var/www/apollin.com.
Reach out to me at info at apollin.com, I’ll try to help you identify the problem on your server! 🙂
Thanks,
Arek
Hi, thanks for the guide! You have a typo on the “Installing PHP and necessary extensions” part. You have `hp-curl` instead of `php-curl`.
I’m brand new to Digital Ocean and I’m finding this guide very helpful. I’m also following a few other Digital Ocean/LEMP/WordPress guides and I see that they only install `php-fpm php-mysql`.
What are the other extensions `[php-curl php-gd php-intl php-mbstring php-soap php-xml php-xmlrpc php-zip ` you have listed used for? Are they required for WordPress?
Hi Kassandra, thank you for the feedback! I’ve fixed the typo.
Regarding your questions – curl is a library to make data transfers via different protocols, so it’s used e.g. when the WordPress is being updated automatically (it has to download the WordPress archive)
zip – will be necessary to programmatically unzip archives (e.g. plugins) when you upload them
gd – image library used by WordPress for image manipulation
intl – internationalization (so different languages for your website)
mbstring – multi-byte string functions, used to manage non-ascii strings
soap – messaging protocol (something like REST, let’s say)
xml, xmlrpc – XML related libraries, WordPress and some of plugins use them
If you’ve got any other questions, I’m here to help! 🙂
Hi,
Great guide. I have some doubts though:
1. Do you think this will work with Linode since the operations are the same?
2. I see that you installed PHP 7.2 (that’s what I understand) should we install version 7.3 instead, or is it easy to upgrade?
Thank you
Hi Bayon,
Thanks!
1. It’ll work with Linode and really any other VPS provider. You’re right, operations are the same.
2. Yes, I’ve installed PHP7.2, but would recommend to go with PHP7.4 now, as it’s the latest version available. If you’d go with PHP7.2 it’s also relatively easy to upgrade to higher versions. If you’d have any troubles, contact me and I’ll help 🙂
Arek
Thanks for the quick reply Arek,
I asked about the new PHP version because Site Health status keeps showing me that I am running in an older PHP version. Although it’s a recommendation, I thought I should do something about it. Now I understand it’s not that serious.
I have another question (last one :D), I use a plugin called AAWP, in its dashboard, it is showing that the version of PHP cURL (7.58.0) I have is not up to date, and I should do something about it. Can I do that through the terminal?
Bayon
Hi Bayon,
No worries, you can ask as many question as you’d like to, I’ll try to help with everything 🙂
Yes, you can definitely do that via terminal. One thing is that probably it’ll get upgraded along with your PHP version (as you’ll need to reinstall all of the libraries when changing PHP version), but simple ‘sudo apt-get update && sudo apt-get upgrade’ should do the work as well.
Arek